The Creality Ender-3 V3 SE is a very cost-effective printer that can be purchased for under 100,000 KRW when buying directly from AliExpress.
Personally, I used it more often after purchase and was very satisfied with it.
Although the price is much lower than the K1, the speed is lacking, and most importantly, wireless printing via LAN is impossible. Since I have already experienced wireless printing with the K1, this was a major drawback.. (an inherent limitation..)
Of course, since the basic Klipper firmware was installed, KE printers that allow wireless printing and advanced Klipper features have been released, but unfortunately, they have not yet been officially launched in Korea. Although they can be purchased via AliExpress, they can only be bought at prices subject to import duties, making them feel somewhat lacking in value for money.
However, recently Creality added the SE to the list of supported devices for the Sonic Pad accessory, which allows devices that do not support Klipper firmware to use Klipper functionality. As a result, the Ender-3 V3 SE can now use Klipper firmware.
Sonic Pad Official Site
https://www.creality.com/products/creality-sonic-pad
So, I bought the Sonic Pad during the last mid-year sale and received it last week. I installed and used it on the SE printer, so I'll briefly share my experience.
Please refer to the video below for more details.
However, unfortunately, it cannot be used immediately, and the official website or other official YouTube channels have not yet properly shared how to use the Sonic Pad on the SE printer.. I will try to share the problems I solved through my own trial and error.
1) Update Sonic Pad firmware (for SE support)
Download the latest Sonic Pad firmware, connect it to the included USB, and power on the Sonic Pad to initiate the firmware update. This is necessary to select the Creality Ender-3 V3 SE printer during the Sonic Pad installation process.
I used the latest version, V1.0.6.52.92.
Firmware Download Page
https://www.creality.com/pages/download-creality-sonic-pad

2) Install the SE firmware generated on the Sonic Pad onto the SD card
According to the instructions that appear during Sonic Pad installation, there is a process to copy the SE firmware to a USB drive. Since the Ender-3 V3 SE can update firmware using its built-in SD memory, it is recommended to install the files via USB and then copy them to the SD memory used by the SE, or to use an SD card reader from the start to generate the firmware file on the Sonic Pad.
In my case, I generated the SE firmware file on the USB memory included with the Sonic Pad, copied it to the SD memory, connected it to the SE, turned on the power to perform the firmware update, and proceeded with the Sonic Pad installation process.
If the firmware is installed correctly, a "beep beep beep" sound will come from the original control pad. After removing the control pad and connecting the SE to the Sonic Pad using the serial data cable included with the Sonic Pad, additional settings become possible.
Please refer to the video below for the overall installation process..
3) Required additional parts for using the acceleration correction sensor
To use the acceleration sensor included in the package for Input Shaping, you must connect the sensor to the head using a separate output or adhesive method.
In my case, I created the modeling file and connected it as follows.


You can download the modeling file from the link below.

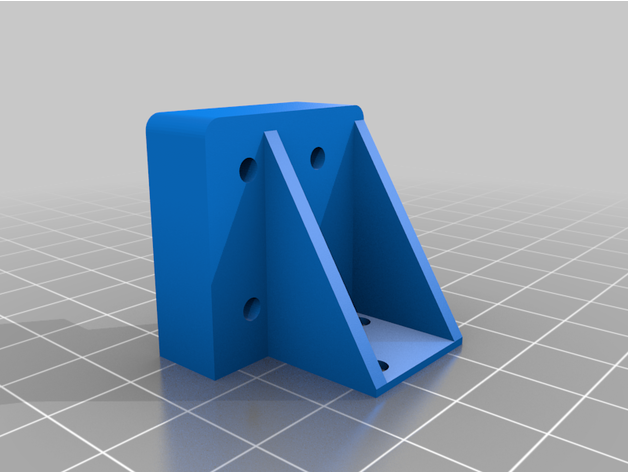
Since this is an initial version, the design may be improved in the future.
(As I was doing Input Shaping, it seemed that the sensor's position should be more centered when adjusting the Y-axis, so I think a modification is needed.)
Short summary of my experience using the Sonic Pad to upgrade the SE with Klipper firmware is as follows.
- Wireless printing is very convenient.
- The quality is definitely better.
- The noise has increased somewhat. It seems the fan noise is set high by default.
- Due to the frame structure, Y-axis slippage occurs when exceeding a certain acceleration (approx. 4,000 mm/s^2). There are limits to the frame.
It seems to be about that much. The Sonic Pad itself has a maximum acceleration of 5,000, so some structural improvements seem necessary to use this acceleration to the fullest.
This concludes the brief introduction to using the Sonic Pad on the Ender-3 V3 SE printer.
I'll try it out more in the future and introduce any additional tips I find.
Creality Ender-3 V3 SE Purchase Link
https://s.click.aliexpress.com/e/_Dd7h8nb
Creality Sonic Pad Purchase Link
https://s.click.aliexpress.com/e/_DmZE8Oh
Creality Nebula AI Camera Purchase Link
https://s.click.aliexpress.com/e/_DkAVvpF